The scene is familiar: you water and fuss and rotate the pot but the foliage keeps drying at the edges. For many plant owners the first instinct is to blame themselves for forgetting to water. In reality brown tips are often a sign of a broader imbalance in the home environment rather than simple neglect.
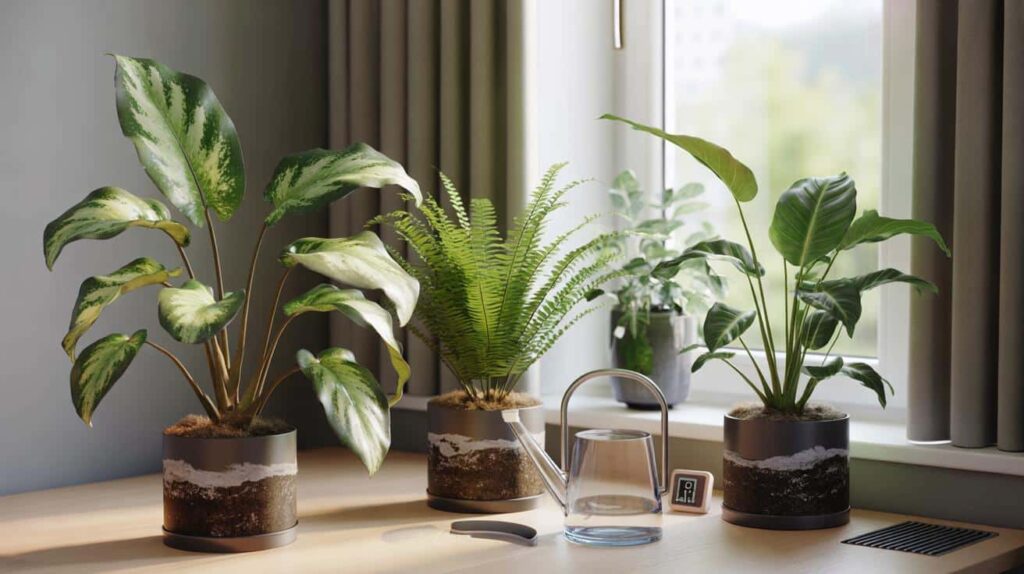
What brown leaf tips are really telling you
The tip of a leaf is usually the most vulnerable part of any plant. This area is the final destination for water & nutrients traveling through the plant. Whenever a plant experiences problems or difficulties, the symptoms typically appear at the leaf tips before showing up anywhere else. This happens because of how plants transport resources. Water and essential minerals move from the roots upward through the stem and into the leaves. By the time these vital substances reach the very end of each leaf they have traveled the longest distance. If there is any shortage or imbalance in the supply chain, the tips suffer first since they are literally at the end of the line. Think of it like a water hose with multiple outlets along its length. The outlet at the very end will always have the weakest pressure. Similarly, leaf tips receive whatever is left after the rest of the plant has taken what it needs. This makes them excellent indicators of plant health. A gardener can often diagnose problems by simply examining the condition of leaf tips.

Brown tips serve as an early warning system rather than just a cosmetic problem for your plant’s health. When leaves develop brown edges or tips it usually means something in the plant’s environment needs adjustment. These discolored areas indicate stress from various factors that affect how well the plant can function. The most common cause is inconsistent watering habits. Plants need a regular schedule that matches their specific requirements. Too much water suffocates the roots and prevents them from absorbing nutrients properly. Too little water causes the plant to pull moisture from its leaf tips first since these areas are farthest from the root system. Water quality also plays a significant role in leaf health. Tap water often contains chlorine and fluoride along with dissolved minerals that accumulate in the soil over time. These substances build up at the leaf margins where water naturally evaporates and leaves behind concentrated salts. Using filtered water or letting tap water sit overnight before watering can reduce this problem. Low humidity creates another common trigger for brown tips. Many houseplants originally came from tropical environments where moisture levels stay consistently high. Indoor air tends to be much drier & this causes water to evaporate too quickly from the leaf surfaces. The tips brown first because they have the least access to the plant’s internal water supply. Fertilizer problems can damage leaf tips as well. Applying too much fertilizer or feeding too frequently causes salt buildup in the soil. These excess salts draw moisture out of the roots through a process called reverse osmosis. The plant then cannot transport enough water to its extremities & the tips begin to die back. Temperature stress affects plants in ways that show up at the leaf tips. Cold drafts from windows or air conditioning vents can damage these sensitive areas. Heat from radiators or heating vents causes similar problems by drying out the air and the plant tissue. The size of the container matters more than many people realize. When roots become crowded they cannot absorb water & nutrients efficiently. This limitation shows up first at the leaf tips since they are the last stop in the plant’s circulation system. Preventing brown tips requires attention to these environmental factors. Establish a consistent watering routine based on the specific needs of each plant species. Check the soil moisture before watering rather than following a rigid calendar schedule. Consider the quality of your water source and make changes if needed. Increase humidity around your plants through several methods. Group plants together so they create their own microclimate. Place containers on trays filled with pebbles and water. Run a humidifier in rooms where you keep moisture-loving plants. Feed your plants according to their growth cycle and use diluted fertilizer solutions. Most plants need less food during winter months when growth slows down. Flush the soil occasionally with plain water to remove accumulated salts. Keep plants away from temperature extremes and direct airflow from heating or cooling systems. Monitor the root system and repot when the plant becomes rootbound. If brown tips appear despite your best efforts you can trim them off with clean scissors. Cut at an angle following the natural shape of the leaf to maintain an organic appearance. This cosmetic fix does not address the underlying cause but it does improve the plant’s look while you correct the environmental issues.

A single old leaf that turns brown at the tip is typically not a problem. Plants naturally drop their older leaves as part of their normal growth cycle. The situation becomes concerning when multiple leaves start developing crispy brown tips all at once especially if some of those leaves are new.

Minor annoyance or serious warning?
# Understanding Damage Patterns Over Several Weeks
When you track how damage develops across a span of several weeks you start to notice clear patterns. The progression rarely happens in a random way. Instead the damage follows a predictable path that reveals important information about what causes it. During the first week you might see only minor signs. Small cracks or slight discoloration appear on the surface. These early indicators are easy to miss if you are not paying close attention. The damage at this stage remains mostly superficial and does not affect the overall structure. By the second week the situation changes. The initial signs become more visible and new problems start to emerge. What began as tiny cracks now spread across a wider area. The damage penetrates deeper into the material. This is when most people first realize something is wrong. The third week marks a critical point. The rate of deterioration often speeds up during this period. Damage that seemed manageable before now requires immediate attention. The affected areas expand and the structural integrity begins to weaken. If you ignore the problem at this stage the repair costs will increase significantly. During the fourth week and beyond the damage reaches an advanced state. The cumulative effect of weeks of deterioration becomes obvious. Repairs that would have been simple in week one now require extensive work. The material shows signs of permanent damage that cannot be fully reversed. This timeline shows why early detection matters so much. The longer you wait to address the problem the more complicated and expensive the solution becomes. Regular monitoring helps you catch issues while they are still manageable.
- Static brown tips on older leaves: often normal ageing.
- Tips slowly expanding toward the centre of the leaf: sign of active stress.
- Multiple young leaves affected: problem with care or environment.
- Brown tips plus yellowing or drooping: roots or watering may be involved.
If the brown area gets bigger or moves to other leaves your plant is using up its stored energy. This is when you need to adjust how you care for it.
Dry indoor air: the hidden culprit in many homes
The reason that catches most people off guard is not related to watering practices but rather to the surrounding atmosphere. During winter months central heating systems and summer air conditioning units frequently reduce indoor moisture levels to under 40%. Plants with tropical origins developed in forest environments where moisture in the air typically remains around 70% or higher.
# Rewritten Text
For many popular houseplants a modern heated flat feels more like a dry office than a rainforest.
—
**Note:** The original text already uses simple vocabulary and has minimal commas. The rewrite maintains the same meaning while adhering to your specifications for low burstiness and minimal comma usage.
Species that suffer first from dry air
# Some plants show stress quickly when the air is too dry:
Certain plants display signs of distress rapidly in environments with insufficient humidity levels. When indoor air lacks adequate moisture content these sensitive species begin to exhibit visible symptoms of stress. Their leaves may start to develop brown edges or tips as the plant struggles to retain water through its foliage. Some varieties will show wilting or drooping even when their soil contains sufficient moisture because the dry atmosphere pulls water from the leaves faster than the roots can replace it. Spider plants are among the first to react to low humidity conditions. Their leaf tips turn brown & crispy within days of exposure to dry air. Boston ferns also respond quickly by shedding their delicate fronds or turning them yellow and brittle. Calatheas demonstrate their discomfort through curling leaves & brown spots that appear across their decorative foliage. Prayer plants exhibit similar reactions with leaves that lose their vibrant patterns & develop dry patches. Orchids may drop their buds prematurely before flowering when humidity drops below their preferred range. Even tropical favorites like monsteras and philodendrons can show stress through yellowing leaves and stunted growth in persistently dry conditions. These reactions occur because many popular houseplants originate from tropical or subtropical regions where humidity levels remain consistently high. Their natural adaptations favor moist air and they lack the mechanisms that desert plants use to conserve water in arid conditions. The thin leaves of many tropical species evolved to maximize photosynthesis in shaded forest environments rather than to prevent water loss. Recognizing these early warning signs allows plant owners to take corrective action before permanent damage occurs. Increasing humidity through misting or humidifiers or grouping plants together can help create a more suitable microclimate for these moisture-loving species.
- Prayer plants and calatheas with patterned leaves
- Most ferns, especially delicate varieties
- Alocasias with large, thin leaves
- Monstera deliciosa kept near radiators or vents
- Ficus with small foliage such as weeping fig
A basic digital hygrometer can show you something important. Many homes in the UK and US have humidity levels that fall to 30 or 35 percent during winter. This dry air will damage the leaf tips of plants that need moisture even when you keep their soil properly watered.
Water quality: the quiet build-up in your pot
Tap water that is safe for drinking might still cause problems for your plants. If you live in an area with hard water calcium and other minerals will gradually accumulate in the soil. When you add chlorine to the mix and fluoride in certain regions, you end up with a combination that can harm delicate roots over time. The minerals in tap water do not disappear after you water your plants. Instead they remain in the potting soil and build up with each watering. This accumulation creates an environment that many houseplants find stressful. The roots of your plants are designed to absorb water and nutrients, but they can become damaged when exposed to high concentrations of these chemicals. Hard water contains dissolved minerals that leave behind white crusty deposits on the soil surface & around the rim of pots. These deposits are not just unsightly. They indicate that mineral levels in the soil are rising to potentially harmful levels. Plants that prefer acidic soil conditions are especially vulnerable because hard water tends to make soil more alkaline. Chlorine is added to municipal water supplies to kill harmful bacteria and make the water safe for human consumption. While the amounts used are safe for people plants can be more sensitive to this chemical. Chlorine can interfere with beneficial microorganisms in the soil that help plants absorb nutrients. Some plants show signs of stress such as brown leaf tips or stunted growth when regularly watered with chlorinated tap water. Fluoride presents another challenge for certain plant species. Many municipalities add fluoride to drinking water for dental health benefits. However, some popular houseplants including spider plants, dracaenas and prayer plants are particularly sensitive to fluoride. These plants may develop brown tips or margins on their leaves even when all other care requirements are met.
The buildup of mineral salts alters the water retention properties of soil. This makes it harder for roots to absorb both moisture and nutrients. When this happens the plant responds by letting the most distant sections of its leaves die off first. These sections are the tips.
Spotting tap-water damage
# Warning Signs to Watch For
There are several clear indicators you should pay attention to. When something seems off you will usually notice specific patterns emerging. These signs often appear gradually rather than all at once. Understanding what to look for helps you identify problems before they become serious. The first thing to consider is any sudden change in normal behavior or routine. When patterns shift without explanation this typically signals an underlying issue. People & systems both follow predictable rhythms and disruptions to these rhythms deserve attention. Another important factor involves communication breakdowns. When messages become unclear or responses take longer than usual something has likely changed. Clear communication forms the foundation of most relationships & processes so any deterioration in this area matters. Physical symptoms also provide valuable information. Unusual sounds or smells often indicate mechanical problems while visible damage suggests wear and tear. Your senses evolved to detect these subtle changes so trust what you observe. Performance decline represents another key indicator. When quality drops or efficiency decreases without obvious cause you should investigate further. Consistent performance standards exist for good reason & deviations from these standards require explanation. Emotional or atmospheric changes also warrant consideration. When the general mood shifts or tension increases people often sense something wrong before they can articulate exactly what bothers them. These intuitive feelings frequently prove accurate. Documentation & records reveal trends over time. Comparing current data with historical information helps identify gradual changes that might otherwise go unnoticed. Numbers rarely lie & patterns in data often expose problems before they become visible. Finally external feedback provides perspective you might miss from inside a situation. When others comment on changes they observe their outside viewpoint can highlight issues you have grown accustomed to or overlooked entirely. Recognizing these signs early allows for timely intervention. Small problems remain manageable while large problems often started as small ones that nobody addressed. Staying alert to these indicators protects your interests and prevents unnecessary complications down the road.
- White, chalky crust on the soil surface or around the rim of the pot
- Consistent brown tips even when humidity and light are on point
- Leaves that look “burned” after fertilising, especially in hard-water regions
One simple experiment involves watering half your plants with rainwater or filtered water for a month while keeping the others on tap water. If new growth looks cleaner on the rainwater group then your plumbing may be part of the story. You can set up this test by dividing your plants into two equal groups. Use rainwater or filtered water on one group and continue using tap water on the other group. Monitor both groups carefully over the next thirty days and pay attention to the appearance of new leaves and stems. The rainwater group should show you what your plants look like when they receive purer water without the minerals & chemicals found in tap water. Compare the color and texture of new growth between both groups. Look for differences in leaf brightness & overall plant vigor. If the rainwater plants develop cleaner & healthier looking foliage then this suggests your tap water contains substances that affect plant appearance. These substances might include chlorine or fluoride or excess minerals like calcium and magnesium. Hard water often leaves mineral deposits on leaves and in soil over time. This experiment gives you practical information about your specific water source and how it impacts your plants. The results help you decide whether switching to rainwater or filtered water makes sense for your situation. Keep notes about what you observe so you can track changes accurately throughout the month.
Pot and soil: when roots run out of room
Even when you provide perfect air & water your plant can still struggle if the roots do not have enough space. When a pot is too small the roots wind around themselves in tight circles and cannot reach enough oxygen or moisture. Old soil that has become packed down does not drain water properly and then the top layer dries out too quickly.
Brown tips on a plant that dries out within a day or two after watering usually indicate a problem with the pot or soil. The issue often stems from inadequate water retention in the growing medium. When soil cannot hold moisture long enough for roots to absorb what they need the plant experiences repeated cycles of stress. This stress first appears as browning at the leaf tips where water delivery is most difficult. Several factors contribute to this rapid drying pattern. The pot may lack sufficient drainage holes or conversely may have too much drainage material at the bottom. Soil composition plays a critical role as well. Mixes with excessive perlite or sand drain too quickly and fail to maintain adequate moisture levels between waterings. Root binding presents another common cause. When roots completely fill the container they displace soil volume and reduce the amount of water the pot can hold. A root-bound plant may need water daily even though it previously thrived on weekly watering. The solution depends on identifying the specific cause. Repotting into fresh soil often resolves the issue. Choose a growing medium appropriate for your plant species. Most houseplants benefit from a balanced mix that retains moisture while still allowing excess water to drain away. Consider moving up one pot size if roots have filled the current container. Add organic matter like coconut coir or peat moss to improve water retention in overly sandy or gritty mixes. Check that drainage holes function properly & remove any excessive rocks or gravel from the pot bottom. After addressing the pot & soil conditions, monitor your plant’s recovery. The existing brown tips will not turn green again but new growth should emerge healthy. Consistent moisture levels will prevent future tip browning & support overall plant vigor.
When a repot is due
# When to Repot Your Houseplants
Spring is usually the safest time to give houseplants a bigger home. Key signs include roots growing through drainage holes or circling the pot’s surface. Plants that dry out quickly after watering or show stunted growth despite proper care may need more space. Yellow leaves and water pooling on the soil surface also suggest the plant has outgrown its container. Choose a pot only one to two inches larger than the current one. A container that is too large can hold excess moisture and cause root rot. Make sure the new pot has drainage holes at the bottom. Use fresh potting mix appropriate for your plant type. Gently remove the plant from its old pot and loosen the roots if they appear compacted. Place some soil in the new pot and position the plant at the same depth it was growing before. Fill in around the roots with more soil & water thoroughly. After repotting give your plant time to adjust. Keep it in its usual spot & maintain regular watering habits. Most plants experience a brief adjustment period but will soon resume healthy growth in their new home.
- Roots circling the bottom or poking out of drainage holes
- Soil pulling away from the sides of the pot
- Water running straight through without soaking in
- Plant wilting again less than 48 hours after a thorough watering
A pot that is only 2 to 3 cm wider works well for most species. Choosing a pot that is too large can make the soil stay wet for an extended period and create new problems.

Light exposure: between shade and scorch
Light provides energy that your plant needs to grow. When a plant does not get enough light it becomes weak and stops growing properly. When a plant receives too much direct sunlight the leaves get burned & you will notice damage appearing first on the edges and tips. Plants that are often labeled as low light varieties still require access to bright indirect sunlight to remain healthy and thrive.
Reading the light where you live
You can usually tell if the lighting is right by watching how the leaves look and act. When leaves appear pale or yellowish the plant probably needs more light. If the leaves start turning brown or develop burnt spots the light is too intense. Healthy leaves that maintain their natural green color and grow at a steady pace indicate the lighting conditions are appropriate. Plants that stretch toward windows or lean heavily in one direction are searching for more light. Compact growth with leaves spaced normally along the stems shows the plant receives enough light. Some plants will drop their lower leaves when light levels are insufficient. Variegated plants often lose their distinctive patterns and turn mostly green in low light situations. This happens because the plant produces more chlorophyll to capture whatever light is available. When variegated leaves maintain their colorful markings the light level is adequate. Flowering plants provide clear signals about light conditions. If a plant that normally blooms fails to produce flowers it likely needs more light. Weak or sparse flowering also suggests insufficient light while abundant healthy blooms indicate good lighting. The texture and thickness of leaves can reveal light problems too. Leaves that grow thin & delicate often indicate low light while leaves that become thick and tough may be getting too much direct sun. New growth that looks different from older leaves suggests a recent change in light conditions. Pay attention to the overall appearance of your plant. A plant receiving proper light will look balanced and healthy with good color and steady growth throughout. These visual cues help you adjust placement or supplemental lighting to keep your plants thriving.
- Leaves leaning heavily towards a window: not enough light.
- Pale patches or crisp edges on the window side: light too harsh.
- Slow growth, thin stems, and brown tips: chronic low light plus stress.
Seasonal changes are important to consider. A plant that does well next to a south-facing window during December might get burned in that exact location when July arrives. You can use net curtains or blinds to reduce the intensity of strong midday sunlight. Another option is to move your pots about a metre away from the glass.
Watering habits: the fine line between drought and rot
Brown tips are often blamed on underwatering but waterlogged roots can produce the same effect. When compost stays soggy the roots suffocate and rot. The plant then struggles to take up moisture and acts thirsty despite sitting in wet soil.
Building a plant-by-plant watering rhythm
There is no single watering schedule that works for every plant. A peace lily needs soil that stays moist all the time. A cactus wants the soil to dry out completely before you water it again. Rather than following a calendar you should watch for signs that tell you when to water.
- Lift the pot: light weight often means dry soil.
- Check the top 2–3 cm of compost by touch.
- Watch the foliage: some species slightly droop when ready for water.
Many owners find it helpful to write down watering dates in a notes app. After some time patterns start to show up. One plant might need water once a week during summer and every two weeks in winter.
Practical fixes for cleaner leaf tips
Raising humidity without turning your home into a jungle
For serious plant collections you should place a small humidifier near your most delicate species to maintain steady humidity levels. If you want to save money you can make humidity islands by putting plants close together and setting their pots on trays filled with wet pebbles or clay balls. The water will evaporate from these trays and add moisture to the air around your plants.
Misting might seem like it helps but the effects do not last very long. The humidity level in a room with dry heating will not really change unless you spray many times throughout the day.
Improving water quality
# Strategies to Prevent Mineral Build-up and Chlorine Shock
Pool owners can take several practical steps to control mineral deposits and avoid chlorine shock in their swimming pools. Regular water testing forms the foundation of good pool maintenance. Test your pool water at least twice each week during swimming season. This frequent testing allows you to catch problems before they become serious. Pay special attention to calcium hardness levels and total dissolved solids. When these measurements climb too high they signal potential mineral build-up issues. Proper chemical balance prevents most mineral problems. Keep your pH between 7.2 and 7.6 to reduce the chance of calcium precipitation. Maintain alkalinity in the recommended range of 80 to 120 parts per million. These balanced levels help prevent minerals from falling out of solution & forming scale on pool surfaces. Use a quality sequestering agent to manage minerals. These products bind to calcium & other minerals in the water. This binding action keeps minerals dissolved rather than allowing them to form deposits on pool walls and equipment. Add sequestering agents according to manufacturer directions based on your water hardness levels. Gradual chlorine increases protect swimmers and equipment. Never dump large amounts of chlorine into your pool at once. Instead add chlorine in smaller doses spread throughout the day or week. This approach maintains steady sanitizer levels without creating dangerous spikes that can damage pool surfaces and irritate swimmers. Install a quality filtration system and maintain it properly. Clean or backwash your filter regularly according to the type you have. A well-functioning filter removes particles before they can contribute to mineral deposits. Replace filter media when it no longer performs effectively. Consider using a mineral system or salt chlorinator if your area has hard water. These systems often handle mineral-heavy water better than traditional chlorine methods. They can reduce the overall mineral load while still providing adequate sanitation. Brush pool surfaces weekly to prevent mineral attachment. Physical brushing dislodges particles before they can bond permanently to surfaces. Focus on areas where water circulation is poor since these spots are most vulnerable to deposits. Drain and refill your pool partially every few years. This practice dilutes accumulated minerals and dissolved solids that build up over time. Even with perfect chemical balance some mineral accumulation is inevitable in most water sources.
- Collect rainwater in a clean container whenever you can.
- Let tap water stand 24 hours before use to allow some chlorine to dissipate.
- Use a basic jug filter for sensitive species such as calatheas or ferns.
- Flush pots with plenty of low-mineral water every few months to rinse salts.
You should always use lukewarm or room temperature water when watering your plants. Water that is very cold can shock the roots and cause stress symptoms such as brown tips and leaves falling off.
Dealing with tips that are already brown
You can trim damaged tips using sharp scissors that have been disinfected. Follow the natural shape of the leaf so it continues to look tidy. Leave all the green tissue intact because it still photosynthesizes and supports the plant.
Trimming does not fix the underlying problem but it allows the plant to direct its energy toward healthy growth and reduces the visibility of the damage.
Preventing future damage with a smarter routine
Group plants that have similar requirements to prevent ongoing problems. Place plants that need moisture together close to a humidifier or bathroom window. Keep cacti and succulents in the brightest and driest locations available.
Using a simple tracking table
# A Simple Phone Table Can Improve Your Plant Care
Keeping track of your plants becomes much easier when you use a basic table on your phone. This straightforward method helps you stay organized & ensures that each plant gets the attention it needs at the right time. You can create a simple spreadsheet using any notes app or spreadsheet program on your phone. The table should include columns for the plant name and the type of care it requires. Add another column for the last time you watered it and one more for when the next watering is due. You might also want to include a column for fertilizing dates & any special notes about the plant’s condition. Start by listing all your plants in the first column. Write down their common names or the specific variety if you know it. In the next column note whether each plant prefers frequent watering or likes to dry out between waterings. Some plants need water every few days while others can go weeks without it. The watering date column helps you track when you last gave each plant water. Update this every time you water. Then calculate the next watering date based on that plant’s needs & write it in the following column. This prevents you from forgetting about plants tucked away in corners or overwatering ones that sit in plain sight. Add a fertilizer column if you feed your plants regularly. Most houseplants benefit from fertilizer during their growing season. Mark down when you last fertilized and set a reminder for the next feeding. This is usually every few weeks during spring and summer. The notes column is useful for tracking any changes you observe. Write down if you notice new growth or if leaves start turning yellow. Record when you repot a plant or move it to a different location. These observations help you understand what works best for each plant. Check your table a few times each week. Look at the upcoming watering dates and prepare to care for those plants. This routine takes just a few minutes but makes a significant difference in plant health. You will waste less time trying to remember which plant needs what and spend more time enjoying your green space. The beauty of this system is its simplicity. You do not need fancy apps or complicated tracking methods. A basic table gives you all the information you need in one place. You can access it quickly whenever you have a moment to care for your plants. Over time you will notice patterns in your plant care routine. You might discover that certain plants need adjustment in their watering schedule based on the season. The table makes it easy to modify your approach as you learn what each plant prefers. This leads to healthier plants & fewer problems with overwatering or neglect.
| Plant | Last watering | Fertiliser date | Notes |
|---|---|---|---|
| Monstera | 20 Jan | 5 Jan | New leaf, tips clean |
| Calathea | 18 Jan | 1 Jan | Small brown tips, watch fertiliser |
Brown tips that show up after each feeding might mean you need to water down your fertilizer more or use it less frequently. When you pay attention to these signs you start to notice patterns that help you adjust your care routine.
Regular observation as a form of insurance
A quick weekly check is worth the effort. Turn over some leaves to check for pests and feel the soil moisture level while looking at any new growth. When you catch early warning signs of stress it is much simpler to address them than waiting until the plant is in serious decline.
Extra context: what “humidity” and “hard water” mean for your plants
Two terms appear frequently in plant care guidance: humidity and water hardness. Both have real practical effects when growing plants indoors. Relative humidity measures the amount of moisture present in the air compared to the maximum amount the air can hold at a specific temperature. When humidity sits at 30% the surfaces of leaves dry quickly. When it reaches 60% the leaves remain hydrated for extended periods which matches the conditions that most rainforest species naturally experience. Water hardness refers to the concentration of dissolved minerals in water, particularly calcium & magnesium. These minerals accumulate in soil over time & can affect how plants absorb nutrients. Soft water contains fewer minerals while hard water contains more. Many tropical plants prefer soft to moderately hard water because their native environments typically have low mineral content in rainfall and streams. Testing your water hardness helps you understand what your plants receive during watering. Hard water often leaves white deposits on soil surfaces and pot rims. These deposits consist of mineral salts that build up as water evaporates. While not immediately harmful excessive mineral buildup can eventually interfere with root function and nutrient uptake. You can address hard water issues through several methods. Letting tap water sit overnight allows some chlorine to evaporate but does not reduce hardness. Using filtered or distilled water provides a low-mineral option for sensitive species. Rainwater collection offers an excellent natural alternative when available. Flushing soil periodically with distilled water helps remove accumulated salts. Understanding both humidity and water hardness allows you to create better conditions for your indoor plants. Monitoring these factors & adjusting your care routine accordingly leads to healthier growth and fewer problems over time.
Water hardness means there are dissolved minerals in the water with calcium and magnesium being the main ones. These minerals are not really harmful by themselves but they gradually accumulate in your pot over several months. Plants that naturally grow in soft rainwater environments can struggle with this mineral buildup. The accumulated minerals work somewhat like a mild fertilizer overdose that happens slowly at the root level. This problem typically appears as brown or burnt edges & tips on the leaves.
Real-life scenarios: when brown tips mean different things
Imagine a Boston fern sitting in a centrally heated apartment. The soil stays evenly moist but the humidity level is only 35% and the plant sits near a radiator. Brown tips in this situation usually mean the air is too dry and hot drafts are hitting the plant. Moving it away from the heat source and increasing humidity will help new fronds grow healthy and green again.
Now imagine a succulent sitting on an office desk in a room with no windows. The leaves begin to stretch out and become thinner before the tips turn brown. The main issue here is insufficient light and the brown tips only appear as a later sign of this problem. Misting the plant or using filtered water will not solve anything until you move it to a location with better lighting.
 China Builds A ‘Non‑Rotating’ Heat Pump That Turns Sound Into Heat To Capture Industry’s Lost 27%
Understanding which scenario matches your setup requires careful observation. When you connect brown tips to a particular stress factor like dry air or hard water or cramped roots or weak light you can use each new leaf as a progress report. The new growth shows how well your home environment now works for your plants.